[Fix] Ubuntu Second Monitor Not Detected (100% Working)
The most common reason is hardware failure if your second monitor is not detected on Ubuntu. It can be the cable or the monitor itself that is faulty. But if you can confirm both are okay by testing them with other devices, the second most probable cause will be an outdated driver.
Or perhaps, the kernel version you’re running is the culprit, causing your display driver to stop running. In that case, you have to pick a different kernel to boot with. Besides, you can try to detect the second monitor manually as well.
Reasons Behind Why Is 2nd Monitor Not Detected
If Ubuntu is not detecting your second monitor, it will be due to one of the following reasons. Otherwise, there’s most likely a technical issue, such as an improper HDMI connection and a faulty cable or monitor.
1. Outdated Driver
An outdated display driver can be the culprit when Ubuntu is not detecting external displays, especially if you have a graphics card installed.
Updates remove bugs and security breaches from the software and optimize it for newer versions of the OS. So, if you haven’t updated your drivers yet, chances are it is having compatibility issues with the current version of Ubuntu you’re using. Hence, the problem with detecting monitors.
2. Driver Stopped Running in Favor of Another
Type in the following code inside the terminal to view your system information.
”inxi -Fxxz”
Look at the Display section of the info that appears after executing the code. You may see something like “Display: x11 server: X.Org 1.20.9 driver: ati,fbdev unloaded:modesetting”.
What it means is the OS stopped the X.Org driver from running to let Mode setting, a generic fallback driver, run. And since the driver is on halt, Ubuntu fails to detect the additional monitor.
How Do I Get Ubuntu to Recognize My Second Monitor
Follow these methods if you wish for Ubuntu to recognize your second monitor.
Method 1: Unplug and Plug in the HDMI Cable Again
Before trying anything else, try this simple workaround and see if it works. It may save a lot of hassle beforehand.
- Unplug the HDMI cable used to connect the second monitor to your computer.
- Reboot your PC.
- Plug the cable back in and check if the display gets recognized.
Method 2: Update Your Drivers
Outdated drivers can prevent graphics devices and monitors from being detected by Ubuntu or any other OS. So, always keep the drivers up to date by upgrading them to their latest version. The steps below show how.
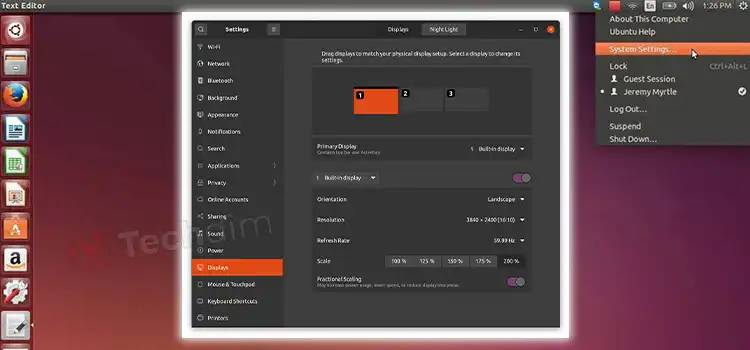
- Open the Settings menu on Ubuntu.
- Go to System and then Software & Updates.
- Inside the Software & Updates section, click on Additional Drivers.

Ubuntu will then look for available driver updates and missing drivers.
- Install the drivers using the terminal.

How Do I Manually Detect My Second Monitor
Detecting your second monitor manually will require either of the following.
1. Use the Nvidia X Server Settings
If you have an Nvidia graphics card, Ubuntu may misbehave while trying to detect a secondary display. And sometimes, the usual approach of going through Applications, then System Tools, and the Administration settings does not help. In that case, you can try the following path instead.
- Go to Applications and click on the System Tools option.
- Then, instead of opening the System Settings, click Administration.
- Inside Administration, you should see the Nvidia X Server settings. There, select a different monitor that is getting recognized at the moment. Doing so will let you use the additional monitor unless there’s some technical issue.
2. Pick a Different Kernel to Boot With
If your display driver got unloaded, switching to a different kernel version might come to the rescue. For example, try choosing an older version like V5.4 if you’re currently running on V5.8. Here’s how to do that.
- Suppose you updated Ubuntu, making the kernel upgrade too. The most logical approach will be checking if your machine has an older kernel. But before that, use the code snippet below to see which versions got installed.
dpkg –list | grep linux-image
- If there are multiple kernel versions, reboot your PC and press ESC when the purple screen appears during the bootup. If that doesn’t do anything, use the SHIFT key instead to go to the Grub screen.

- Pick an older kernel and let the reboot process finish.
- Now, open the terminal and type in the following code to confirm that the kernel you chose got loaded.
uname -r
Conclusion
Often, the auto driver update feature of Ubuntu fails to search for the relevant drivers for your GPU. In that case, you must update them manually, or the second monitor will not be detected. Just go to the downloads section of the manufacturer’s website to get the tar.xz files and relevant drivers.
Subscribe to our newsletter
& plug into
the world of technology