How to Change Visual Effects Settings in Windows 10
Has it ever occurred to you that your PC is running a little bit slower than before? One reason can be the unnecessary visual effects, you can make your PC’s performance better and faster by changing visual effects settings in Windows 10. Though Microsoft has added these visual effects to make your PC look prettier, in some PCs, it can affect the performance and make the OS slower. In this article, I will show you how can you change visual effect settings in windows 10 and recommend the settings you should disable to get better performance.
How to Change Visual Effects Settings in Windows 10:
There are some ways to change the visual effects settings in windows 10. I will show you 3 methods. If one method won’t work on your PC, then you should try another.
Method-1: From Advance System Settings
- Follow any of three options below.
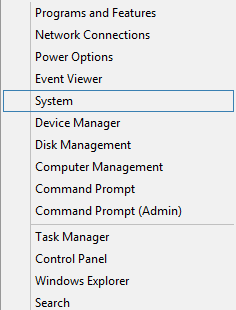
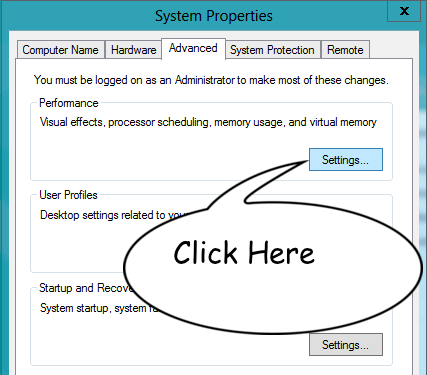
Option One: Press windows+X button and you can see the image like below. Click on ‘System’.
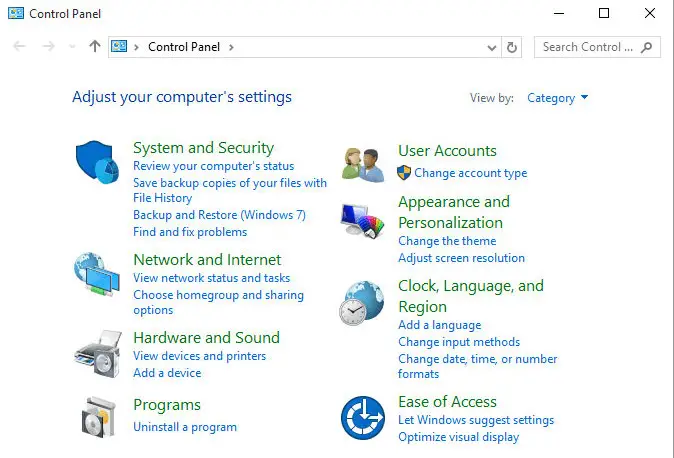
Option Two: Or you can search ‘Control Panel’ in your PC’s search bar and open it. Click on ‘System’. But if you must have to be logged in as an administrator to open ‘System’ like this way.
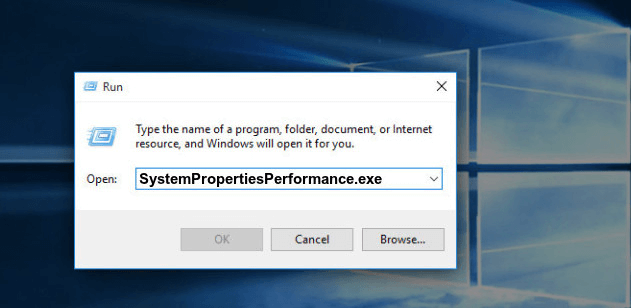
Option Three: Open Run prompt ( Press windows+R) and write SystemPropertiesPerformance.exe and click on. Go to step 4.
Option One: Let Windows choose what’s best for my computer
If you select this option, then windows will automatically decide what to do like windows will turn off and turn on your visual effects settings for your better performance. You can select this option if you have not yet faced any serious trouble.
Option Two: Adjust for best appearance
If you turn on this option, then windows will turn on all your visual settings. If your PC’s capacity is high enough like higher graphics capacity, powerful ram then you can select this option.
Option Three: Adjust for best performance
This will simply turn off all your visual effects. But it’s a fact like you have a headache and you want to cut off your head!
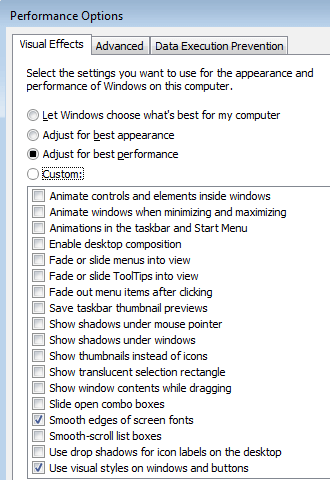
Option Four: Custom
Here you can turn off or on the settings you like to turn off or on. But which settings you should turn off or turn on? If you are not sure enough, then you can see my suggestion below:
If you turn all your visual effect settings off then your PC’s visual performance can be worse than before. So, you can disable these settings below to get the average visual performance and now, it won’t make your PC slower anymore.
• Animate windows when minimizing and maximizing
• Fade or slide ToolTips into view
• Animations in the taskbar
• Enable transparent glass
• Fade or slide menus into view
• Animate windows when minimizing and maximizing
• Slide open combo boxes
• Show shadows under windows
After unchecking these above options, click Apply and then click OK. Now you are done. You can restart your PC now but this is not mandatory.
Method-2: In Ease of Access center
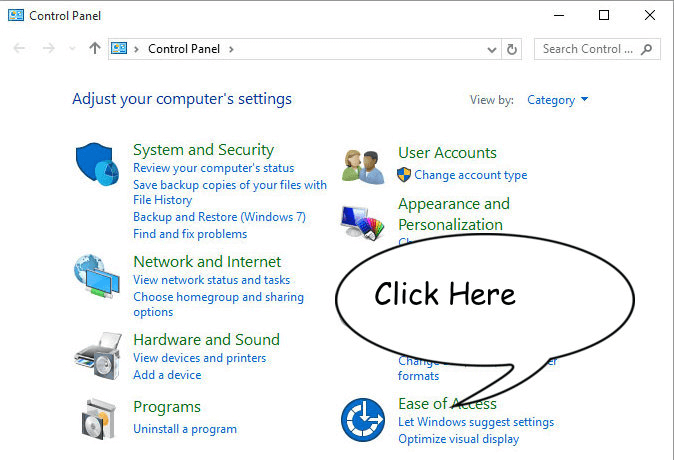
- Search ‘Control Panel’ in your PC’s search bar and open it. Click on ‘ Ease of Access’ option.
Option One: Use the computer without a display
Option Two: Make the computer easier to see
Option Three: Make it easier to focus on tasks
Method 3: In Settings
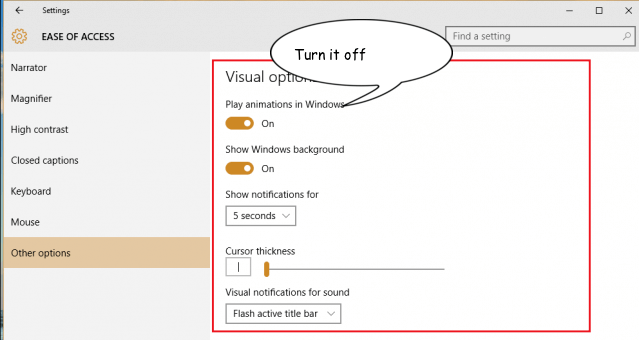
- Search Settings in your PC’s search bar and click on it. Click on ‘ Ease of Access’ option.
- Click on ‘ Other option’ in the left navigation bar and Turn the option ‘Play animations in windows’ off (see the image below). You are done.
Frequently Asked Questions and Answers
How do I turn on performance mode in Windows 10?
Go to settings from start menu, System>Power & Battery.
Which is used to adjust the visual effects of the computer?
Windows sets up the visual effect automatically for your computer. it is determined by the configuration of your computer. however, you can adjust it via the methods described above.
Conclusion
If you have gone through this article, you should have no question about changing visual effects in Windows 10. One more thing is that later you can customize your visual effect settings as you want, but be concerned about the after-effects of customizing. But in general, if you have a slower performance problem of windows 10 and if you have done the above process successfully, you should find your problem solved.
Subscribe to our newsletter
& plug into
the world of technology


Hi, just wanted to tell you, I enjoyed this post. It was funny.
Keep on posting!