How to Unbind Mac from Active Directory?
The Mac OS X operating system features a tool known as Directory Utility which allows domain network administrators to add Apple computers. Since Macs are on the same domain, file sharing and group authentication are within your control.
If you no longer want to connect your macOS with a particular domain, you can easily unbind Mac from the active directory. To know how to disable a server in Directory Utility on Mac, read the entire content very carefully.
Hopefully, you will get the process. Let’s explore.
Active Directory and Its Working Purposes
Microsoft introduced the directory service called Active Directory, which is used to manage and maintain a database containing all the data about the users and devices in your corporation.
In Active Directory, data is saved as objects, perhaps individuals, groups, applications, or devices. These objects are categorized based on their name and characteristics.
The main goal of macOS Active Directory binding is to allow network users to sign in to a connected Mac and access the Active Directory data directly from the macOS device. Additionally, you can manage their network access privileges by using Active Directory.
How to Unbind Mac from Active Directory?
According to your necessity, you may want to unbind Mac from Active Directory. Moreover, you can do it by using the Directory Utility in Mac. I will describe the steps bellow.
Step 1.
First of all, you need to press Command + Spacebar to open the Spotlight Search.
Step 2.
Then from the “Devices” list on the left side of the window, select your internal hard disk.
Step 3.
Now in this stage, launch the “System” and “Library” directories.
Step 4.
You have to open the “CoreServices” folder and then click on the “Directory Utility” icon.
Step 5.
Then select the “Services” tab, which is located at the window’s top,
Step 6.
Now click the lock icon and enter your administrator username and password.
Step 7.
You have to select “Active Directory” from the list of items, then click the “Edit” button.
Step 8.
Your administrator login and password must be entered once again after clicking the “Unbind” button.
Step 9.
The settings will be saved and the device will be removed from the domain when you click “Apply”.
To apply the adjustments, you have to reboot your computer.
Note: Even if the connection is unexpectedly disconnected, the active Directory still has a record of this computer on it.
Above mentioned steps are the process of unbinding or removing Mac from the active directory. But if you change your mind and want to rebind your Mac to the active directory then you have to read the below-mentioned steps about rebinding domain on a Mac.
Bonus Tips: How To Rebind A Domain On A Mac?
Let’s move on to the procedure for connecting a Mac to a Windows or Active Directory domain. You have to make sure the Mac is connected to the network before you Bind or Join a Mac to an Active Directory Domain.
You have to keep in mind that the domain join process will fail if your Mac is unable to communicate with the domain controller.
- Click System Preferences in the Dock on your Mac, and then click ‘Users & Groups’ under the System heading.
- Now by clicking the Lock icon enter an administrator login and password.
- After entering the proper credentials, now the lock icon will display unlocked.
- After selecting Login Options, go to the Network Account Server section, and click the Join button.
- You will notice both Active Directory and LDAPv3 (Lightweight Directory Access Protocol) are available under the heading “Service”. However, they are both grayed out. You must now click the ‘Lock icon’ and enter an administrator username and password again.
- Now you have to choose “Active Directory” and then select the Pencil icon.
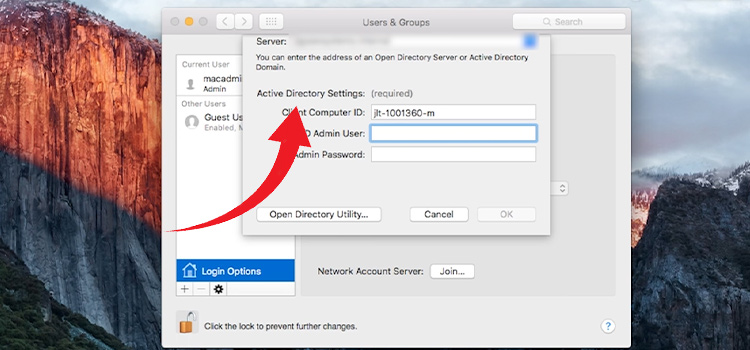
- Now enter the Active Directory domain name here. If necessary, you can specify a new computer ID. Click on ‘Bind’.
- Here you need to press ‘OK’ after Entering a username and password to add this Mac to the domain.
- The Mac has been added successfully to the Active Directory domain. Click ‘OK’.
Frequently Asked Questions (FAQs)
How Do I Disconnect Server From Mac?
To disconnect server from Mac, press Command + Spacebar to open the Spotlight Search. and search for the server. Now, select the server and right-click, then click on Eject. Lastly, reboot your Mac.
How Do I Remove A Mac From A Windows Domain?
You can remove your computer from a Windows domain using the Directory Utility on Mac. The process is nothing but the same as the rebinding process. So, if you want to remove Mac from a Windows domain, you have to follow the chronological steps of unbinding the Mac from the active directory.
Final Words
To conclude, I hope that the content about unbinding Mac from the active directory will be very helpful for you guys. I have tried to include the other aspects of the active directory as well, such as if you change your mind and want to rebind with the active directory then you can read that part as well.
Subscribe to our newsletter
& plug into
the world of technology


My Mac computers have been hijacked to an unknown Open Directory domain and I cannot seem to unbind. I don’t know the server or directory domain name which makes it challenging and furthermore I’m have zero knowledge of directory services. My computers are for personal use and are not affiliated with any enterprise. My understanding is apples is aware that this vector of compromise exists yet have done nothing to stop it. Erase and reinstall has zero effect and once booted my system is hijacked. I can see Kerberos tickets being used etc. Your help and guidance would be very much appreciated! Thanks Jeff