How to Test Computer Power Supply | Easy Steps How to Check PSU
The power supply is a very essential thing for a computer. An adequate power supply is a must for systems to run seamlessly, and many problems occur if the power supply unit fails to provide sufficient voltage levels based on the power consumption. For many problems, checking the power supply can bring out the solutions very easily. But how to test the power supply? In this article, we’re going to discuss how to test the computer power supply with multiple methods.

How to Test Computer Power Supply
Testing hdd disk speed, power supply, power cord, or other units of a PC is great for clearing out issues and make room for improvements.
Among them, the power supply or PSU is a crucial component of a computer. So, before buying or using other PSUs, it’s better to check out their condition. Also, if you are in doubt about your existing power supply then you also can follow these methods to check the condition of the power supply. There are basically three methods that you can follow to check the condition of a PSU.
- Check if PSU turns on or not by performing the Jumper test (with a paper clip)
- Check the individual pins (check PSU health with a testing unit like a multimeter)
- Check the PSU with the help of a PSU tester.
Perform a Jumper Test
This is an easy way to identify if the power supply turns on or not. For performing this jumper test, we will require a paper clip. Now, you may ask why we should use it. Well, for turning on a power supply, you will need to connect the PSU connectors to the motherboard port. Without testing a PSU, it’s not suggested to connect it to the motherboard directly. Therefore, we need a paper clip or you can use wire with a gauge of 16/18AWG. If the clip is coated with paint, you will need to remove the paint from the two ends of the clip, and the metal portion will come out. Now, let’s start the Jumper test and make sure you have disconnected the PSU from the power source.
- Take the PSU and a paper clip.
- Now, enter the paper clip end into the green pin and black pin. Basically, the green pin is for turning on the PSU.
- Pin 14 (Green) and 15 (if you have a 20-pin connector)
- Pin 16 (Green) and 17 (if you have a 24-pin connector)
- Now, plug in the power cord of PSU to an electrical outlet.
At this point, the fan should rotate. If it doesn’t, then most likely your power supply unit is dead. If it rotates, we can proceed to the next step.
Checking The Individual Pins with Help of a Multimeter
Before checking the PSU, we need to check the voltage of the power outlet. We should see a reading somewhere between 230-245V which varies with the rated voltage of individual countries. If the reading matches the rated voltage of your zone, then the power outlet is ok.
Now, the multimeter is ready to check the PSU’s pins. During the test session, the jumper or the paper clip should be inserted into the green and black pin.
Now, switch the knob to the DC connection. Insert the black probe into the black or Ground pin and the red probe into the other pins (the ground, silver, and white pins won’t be used here).
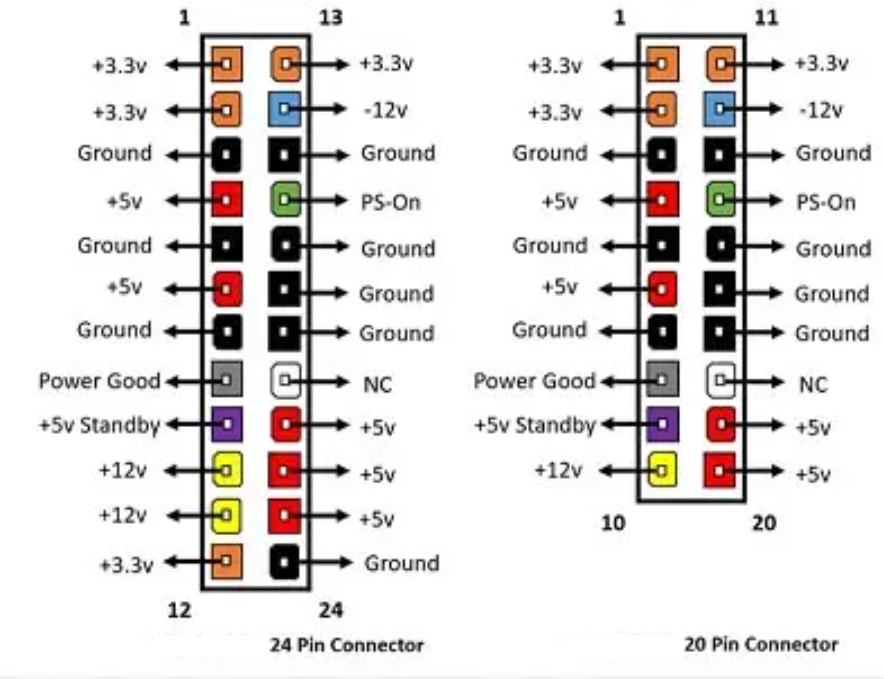
Now, check the signal or voltage of the pins. While testing it, always remember that there is a certain tolerance limit of the voltage and that is 5%. So, follow the chart below and check whether the voltage of the pin is in range or out of range. A list of voltage range for a 24-pins connector is provided below.
| 24-Pin Connector | Signal | 20-Pin Connector | |||
| Pin Color | Pin No | Tolerance | Voltage Range | Pin No | Pin Color |
| Orange | 1,2,12,13 | +3.3V +/- 5% | +3.135V – +3.465V | 1,2,11 | Orange |
| Red | 4,6,21,22,23 | +5 V +/- 5% | +4.75V – +5.25V | 4,6,19,20 | Red |
| Purple | 9 | +5 V +/- 5% | +4.75V – +5.25V | 9 | Purple |
| Yellow | 10,11 | +12 V +/- 5% | +11.40V – +12.60V | 10 | Yellow |
| Blue | 14 | -12 V +/- 5% | (-10.80V) – (-13.20V) | 12 | Blue |
Use PSU Tester to Test PSU
PSU tester is a great device for testing a PSU. You can use it to determine the voltage of each connector of the PSU. It’s like the multimeter, isn’t it? Well, the difference is, you will need to check the pins one by one while using a multimeter. But with the help of the PSU tester, you won’t need to check one by one. You just connect the 4-pin and 24-pin connector to the PSU tester and it will provide you with the voltage of the pins. And it is affordable compared to a multimeter.
Conclusion
To conclude, checking a power supply doesn’t take blood, sweat, and tears. Just simply follow the ways that we have mentioned in this article. After using it for a long time or if you have experienced any unusual behavior then it is best to check if this is working correctly at the first sign of trouble so that you can identify the problem, minimize the damage, and the cost to fix them.
Subscribe to our newsletter
& plug into
the world of technology


Salamoalaikom dear all,
Thanks alot for your help
You are Welcome!