[Fixed] Windows Audio Service Stopping Windows 10 (100% Working)
The Audio Service is not operating or the Windows audio service has stopped is a fairly typical issue that signals that your sound devices are not responding. Some Windows 10 users have reported that this occurs after upgrading Windows via Windows Update. If you’re having trouble with the sound on your Windows 10 computer, here are some efficient strategies to fix audio services that aren’t working.
How To Troubleshoot ‘Windows Audio Service Stopping Windows 10’
Windows Audio Service Should Be Started
1. Go to the Start menu and look for the Windows System folder.
2. Open the Run dialog box by expanding the folder and selecting Run.
3. In the text box, type services.msc and click OK.
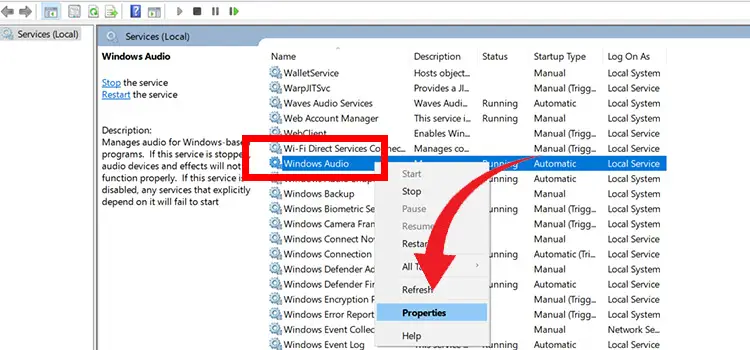
4. In the Services list, look for Windows Audio.
5. Select Restart from the context menu when you right-click on the service.
After that, double-check that Windows Audio’s Startup Type is set to Automatic.
• If it does, simply let it alone.
• If it’s set to Manual or Disabled, right-click on Windows Audio, pick Properties, select Automatic after Startup, click Apply, and then OK.
For Windows Audio Endpoint Builder & Plug and Play, repeat the restart and startup type settings procedures.
Make use of the Command Prompt
1. In the taskbar’s search box, type cmd.
2. Select Run as administrator from the context menu when you right-click on Command Prompt.
3. In Administrator: Command Prompt, type net localgroup Administrators /add networkservice and press Enter.
4. Hit Enter after typing net localgroup Administrators /add localservice.
5. Wait for the orders to complete.
6. Restart your computer.
Change the Registry
1. Click the Run button in the Run dialog box.
2. In the textbox, type regedit.
3. To launch Registry Editor, click the OK button.
4. Expand each of the following keys: HKEY LOCAL MACHINE, SYSTEM, CurrentControlSet, Services, and AudioEndPointBuilder.
5. Choose your parameters.
6. In the right pane, look for ServiceDll and look at the data in the Data column.
7. Change the value data if it is not percent SystemRoot percent System32AudioEndPointBuilder.dll.
8. Restart your computer after closing Registry Editor.
Examine the Audio Components
1. Click the Run button in the Run dialog box.
2. Press Enter after typing msc.
3. Locate the Windows Audio service by scrolling down.
4. Right-click the service and select Properties from the drop-down menu (you can also double click on it directly to open the Windows Audio Properties window.
5. Select Dependencies from the drop-down menu.
6. Expand the window to view all of the components underneath it. The following system components are required for this service to function.
7. Verify that all of the components in the services are started and running.
msc.
8. Reboot the computer after restarting the Windows Audio services.
Windows Audio Drivers Should Be Updated
If the problem began after installing Windows 10 1809, it’s possible that the Audio driver is to blame. Try updating the Audio driver by following the instructions below, which will most likely solve the problem.
• Hold down the Windows key and press the X key to open Device Manager.
• Increase the number of sound, video, and gaming controllers.
• Right-click the Sound card and select Update driver software from the context menu.
• Choose Automatically Search For Updated Driver Software from the drop-down menu.
• This will look for updated drivers and install any new versions that are identified.
• After that, restart Windows and make sure there are no more audio or sound issues.
Install the Windows Audio Driver Again
If Windows failed to discover any driver updates, try reinstalling the Windows Audio driver using the instructions below.
• To launch Device Manager, use Windows Key + R, then type devmgmt.msc and press Enter.
• Increase the number of sounds, video, and gaming controllers
• Select Uninstall from the context menu when you right-click on the sound device.
• Finally, click OK to finalize the removal.
• Restart Windows to delete the old driver software altogether.
•When you restart your computer, open the Device Manager window, go to Action, and select Scan for Hardware Changes.
• This will detect and install the generic audio driver on your computer automatically.
• Now verify if the audio sound is working.
If you can’t locate any driver software, go to the manufacturer’s website and download and install the most recent Audio driver for your device.
In Compitable mode, install the audio driver.
If none of the preceding methods worked, try installing the driver in compatibility mode to see if that helps.
Compatibility Mode Uses Settings From a Prior Version of Windows to Execute the Driver
1. Go to the manufacturer’s website and download the most recent audio driver.
2. Select Properties from the context menu when you right-click on the setup file.
3. Change the location of the Compatibility tab.
4. Select the previous Windows version from the drop down list and check the box next to Run this software in Compatibility mode.
5. After installing the driver, execute the setup file. Examine the features.
Conclusion
I hope the information above assists you in resolving the Audio Services Not Responding problem.
Subscribe to our newsletter
& plug into
the world of technology

![[Fixed] We Can’t Activate Windows on This Device](https://www.techdim.com/wp-content/uploads/2022/01/we-cant-reactivate-windows-on-this-device.jpg)
![[Fix] Nslookup Command Not Found (100% Working)](https://www.techdim.com/wp-content/uploads/2022/07/Nslookup-Command-Not-Found.jpg)